Part 3 CAD Design
Functions for design in CAD
De funktioner i Tegn-menuen. |
 |
Funktionerne tilgængelige i dit program afhænger af din programkonfiguration og kan afvige fra denne beskrivelse. Aktuelle oplysninger om betjening af funktionerne kan altid fås ved hjælp af programhjælpen. |
Hver indtastning (sektion, kontur, ..) begynder med en positionsudveksling. En tilbagetrukket position er en fri bevægelse af maskinen med hævet værktøj til startpositionen. 2D-fræsbevægelser udføres f.eks. ved hjælp af position indsnit. En indsnit position er en fræsning af maskinen med sænket værktøj eller indskåret til den specificerede position. Den ønskede fræsedybde for PosnE bestemmes f.eks. ved hjælp af den indskårne dybde af lagerværktøjet eller i henhold til beregningen af fræsedataene i CAM-området.
| Position A (PosnA) (Position tilbagetrukket = fri bevægelse til startposition) |
Indtastningsstartpunkt for grafikken. Med Position A bestemmes starten på en kontur eller en sektion.
Ingienørhjælp kan aktiveres ved hjælp af midterste museknap (alternativt ved hjælp af eller og højre museknap ).
| Position E (PosnE) (Position indsnit = maskinfræsning) |
Indtastningsstøttepunkt af en 2D-polygon absolut i X og Y. Under cursoren input, føres også en linje kontinuerligt som “gummibånd”. Kun PosnA kan indtastes med et tomt lag.
Handlinger:
| ,,: | Position indsnit. |
| ,: | Ingeniørhjælp (se ovenfor). |
| ,: | Abort indtastning. |
| <W>: | Position tilbagetrukket. |
| <C>: | Luk kontur |
Ingienørhjælp kan aktiveres ved hjælp af midterste museknap (alternativt ved hjælp af eller og højre museknap ).
| Position 3D (Posn3D) |
Indtast en absolut position 3D med X, Y, Z-koordinater. Efter cursor input kan koordinaterne redigeres i 3D. Hvis kun 2 koordinater eller Z = 0 indtastes, oprettes der derefter en 2D-position (PosnE). En 3D-position kan ændres ved hjælp af rediger . forskyd position.
Ingienørhjælp kan aktiveres ved hjælp af midterste museknap (alternativt ved hjælp af eller og højre museknap ).
| Punkt (boring) |
![]() Funktionen Punkt placerer en tilbagetrukket position (PosnA) efterfulgt af en indsnit position (PosnE) ved punktinput. Dette punkt, ligesom næsten alle tegnfunktioner, kan indtastes enten ved hjælp af cursoren eller alternativt dets X/Y-koordinater via tastaturet. Efter input markeres punkter med punktsymbolet
Funktionen Punkt placerer en tilbagetrukket position (PosnA) efterfulgt af en indsnit position (PosnE) ved punktinput. Dette punkt, ligesom næsten alle tegnfunktioner, kan indtastes enten ved hjælp af cursoren eller alternativt dets X/Y-koordinater via tastaturet. Efter input markeres punkter med punktsymbolet ![]() . Borets dybde bestemmes ved hjælp af den indsnittede dybde af lagerværktøjet.
. Borets dybde bestemmes ved hjælp af den indsnittede dybde af lagerværktøjet.
Bemærk: For indtastning af et punktraster kan man arbejde med fangstgridstøtte. Ved hjælp af operat . serietile kan der oprettes regelmæssige punktjusteringer ved kopiering. Punkter kan forsynes med (boring/fræsning) egenskaber i HCAM.
Ingienørhjælp kan aktiveres ved hjælp af midterste museknap (alternativt ved hjælp af eller og højre museknap ).
| Stræk |
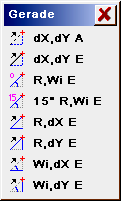 |
Indtastningspunkt (vektor) for en indsnit eller tilbagetrukket linje. Ved indtastning via tastaturet indtastes adskillelsen i X- og Y-retning mellem den sidste position og målpositionen. Cursoren input adskiller sig ikke fra indtastning af en position.
Ingienørhjælp kan aktiveres ved hjælp af midterste museknap (alternativt ved hjælp af eller og højre museknap ). |
Funktionerne i strækket valg:
| Stræk dX,dY A: | Stræk, indsnit, input dX,dY (Positionering hjælp). |
| Stræk dX,dY E: | Stræk, indsnit, input dX,dY. |
| Stræk R,An E: | Stræk, indsnit, input radius, vinkel. |
| Stræk15° R,An E: | Stræk, indsnit, input radius, vinkel delelig med 15°. |
| Stræk R,dX E: | Stræk R(absolut) og +/-dX, bindestreg præfiks dY resultater fra Mouse posn. |
| Stræk R,dY E: | Stræk R(absolut) og +/-dY, præfiks dX resultater fra Mouse posn. |
| Stræk An,dx E: | Stræk An, dX(absolut). |
| Stræk An,dy E: | Stræk An, dY(absolut). |
| Linie S,E |
Input linje med start (PosnA) og slutpunkt (PosnE) absolut.
Ingienørhjælp kan aktiveres ved hjælp af midterste museknap (alternativt ved hjælp af eller og højre museknap ).
| Free-hand line |
Draw a free-hand line using the cursor. After pressing the key the cursor positions are taken over continuously until release and displayed as frequency polygon (section). Free-hand lines are optimised automatically by the program.
| Spline |
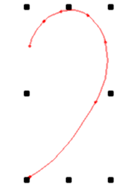
Input a spline using any desired number of support points. the spline resolution (number of the interpolation points) are determined through Input parameters . Spline resolution.
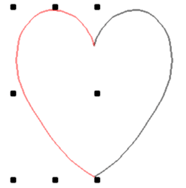
Using the function Spline the next constant curve is drawn through a number of support points. The calculated curve in all cases runs through these points. With small changes in slope these can lie far apart, in tight areas of the curve they should, however, be selected more densely. Points of discontinuity, i.e. kinks in the curve, cannot be input as spline. Here the function must be discontinued and a new spline started. The last position input determines the slope of the curve in the end point.
During the input a line to the position is also carried as “rubber band”. As soon a 3 support positions are input the start of the curve is also drawn. A support point is adopted using . Using the function is ended (last spline position). If, during the input of a spline, a start point is selected near the contour start point, then this point is captured and the contour closed. Further point input creates a new spline with new contour start point.
 |
 |
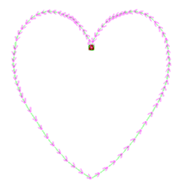 |
| Spline curve | Operat . mirror | Combine tracks |
| Rectangle S,E |
Input a rectangle with an absolute start and an absolute end point. Following input of the zero position the rectangle is continuously codrawn. The rectangle input is acknowledged using and aborted using . The keyboard input takes place via a zero point and the end point of the rectangle diagonally opposite. The instantaneous elongation of the rectangle is displayed in the input line as, for example,
dx=21.4 dy=10.33
| Rectangle S,dX/dY |
Input a rectangle with an absolute start point and the relative elongation in X und Y. Following the input of the zero position (Start point) the rectangle is codrawn continuously. The rectangle input is acknowledged using and aborted using . The keyboard input takes place via the zero position and the elongation of the rectangle using dX and dY. The instantaneous elongation of the rectangle is displayed in the input line as, for example,
dx=21.4 dy=10.33
| Rectangle MP,EP |
Input a rectangle with an absolute middle point and an absolute end point. The rectangle is laid centrally at the middle point (MP). The rectangle input is acknowledged using and aborted using <R>. The keyboard input takes place via the middle point and the end point of the rectangle. The instantaneous elongation of the rectangle is displayed in the input line as, for example,
do=21.4 die=10.33
| Rectangle MP,dX/dY |
Input a rectangle with an absolute start point and the relative elongation in X und Y. Following the input of the middle point the rectangle is codrawn continuously. The rectangle input is acknowledged using and aborted using . The keyboard input takes place via the middle point and the elongation of the rectangle using dX and dY. The instantaneous elongation of the rectangle is displayed in the input line as, for example,
dx=21.4 dy=10.33
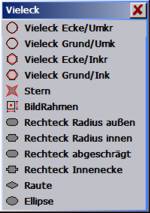
| Polygon |
Input a polygon, star, frame, rectangular object, hash key or ellipse.
 |
 |
 |
 |
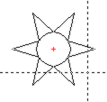
| Polygon selection | Polygon | Star | Rectangular object |
The functions of the polygon selection:
| Polygon corner/prim.:
Polygon corner/inrad.: |
Polygon with perimeter radius.
Polygon with inradius. First the reference position (middle point) of the polygon is interrogated. For this, with the cursor cross, go to the point at which the middle point of the polygon is to lie and press . As further input the number of corners and the angle of a corner are expected – this input must take place via the keyboard. With an angle of 0 deg. a corner lies right at the height of the middle point. The polygon is codrawn during the cursor movements. The circumradius / inradius can be input via the keyboard in mm. |
| Polygon base/perim.:
Polygon base/inrad.: |
Polygon with perimeter radius.
Polygon with inradius. First the reference position (middle point) of the polygon is interrogated. For this, with the cursor cross, go to the point at which the middle point of the polygon is to lie and press . As further input the number of corners and the angle of the baseline are expected – this input must take place via the keyboard. With an angle of 0 deg. the baseline is horizontal. The polygon is codrawn during the cursor movements. The circumradius / inradius can be input via the keyboard in mm. |
| Star: | Star with 3..20 points.
Using this function stars in various shapes can be input simply. Zero position: The middle point of the star is demanded as first point. Corners, angle: As further input the number of points (corners) and the angle of a point are expected – this input must take place via the keyboard With an angle of 0 deg. a point lies right at the height of the middle point. Incircle: the incircle defines the minimum elongation of the points. The incircle can be input via the keyboard or using the cursor. Outer circle: the outer defines the maximum elongation of the points. The outer circle can be input via the keyboard or using the cursor. With the cursor input the points are codrawn. |
| Rectangular object: | Create different rectangular objects as well as hash key and ellipse. Follow the input in the respective windows. The reference position can be selected respectively following selection using , also using the cursor. |
| Arc 3P |
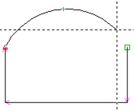 |
Three positions are required for the input of arcs. The end position of the last function or PosnA counts as 1st position. The 2nd and 3rd positions can be input using . The 1st and 3rd positions determine respectively the end points of the arc. The 2nd position should as far as possible lie in the middle of the arc. During the input of the 2nd position a line is carried continuously as “rubber band”. The circle is codrawn with the input of the 3rd position. |
Complete circles (An = 360 deg.) cannot be input directly, because start and end position lie at the same point and thus cannot be completely defined. Complete circles must be input as full circle or replaced through two half circles. The instantaneous arc input using the cursor is displayed in the input line as, for example,
R=27.44 SA=185 Al=15.6
Display R in mm, SA and Al in deg.
| Arc tang. |
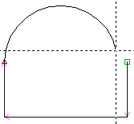 |
Input an arc which closes tangentially to the last input. The last input must be a line or an arc. The instantaneous arc input using the cursor is displayed in the input line as, for example,
Display R in mm, SA and Al in deg. |
| Arc 2P,R |
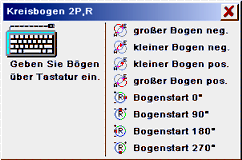 |
Input arc with radius and 2 points (start point and end point). Several variations are possible through specification of direction of rotation, selection of larger/smaller arc and arc start. |
The functions of arc selection:
| Large arc neg.: | Large arc clockwise (math. negative). |
| Small arc neg.: | Small arc clockwise (math. negative). |
| Large arc pos.: | Large arc anticlockwise (math. positive). |
| Small arc pos.: | Small arc anticlockwise (math. positive). |
| Arc start 0° / 90° / 180° / 270°: | Input of arcs using cursor, which close on the last input using a specified angle. |
| Arc keyb. |
 |
Arcs can be input via keyboard. These arcs cannot be input using the cursor. |
The functions of the arc selection:
| Arc R,SA,AL: | Arc input using the keyboard via the input of radius, the start angle and the arc length.
|
||||||
| Arc R,SA,EA: | Arc input using the keyboard via the input of radius, the start angle and end angle. The direction of rotation results from the sign of EA-SA. | ||||||
| R : | Circle radius in mm. | ||||||
| SA : | Angle for start of circle in deg. | ||||||
| EA : | Angle for end of circle in deg. |
| R : | Circular radius in mm. |
| S : | Crown height in mm. |
| Elongated hole (HCAM only) |
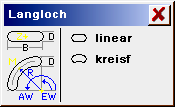 |
Selection for rounded or circular elongated hole. |
 |
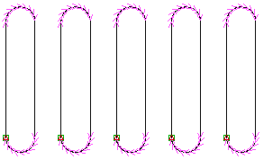 |
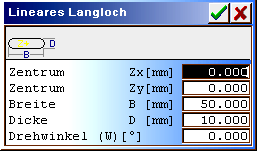
Input for a straight line, horizontal elongated hole. The elongated hole is rounded–off over the complete thickness.
| Centre Zx/Zy: | Reference point (elongated hole middle) in mm. |
| Width B: | Width of elongated hole in mm. |
| Thickness D: | Overall thickness of the elongated hole in mm. |
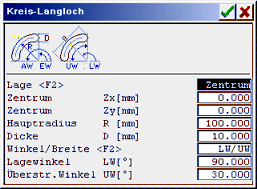 |
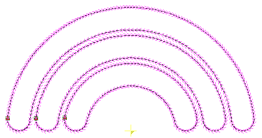 |
Input for an elongated hole in the arc. The reference point and the dimensioning can be determined via various parameters.
| Position : | Shift for input >centre or hole middle. |
| Centre/hole middle: | Reference point in mm. |
| Main radius R: | Radius from centre up to hole middle in mm. |
| Thickness D: | Thickness of the elongated hole in mm. |
| Angle/width : | Shift of the dimensioning. |
| Posn angle/start angle: | Dimensioning angle in deg. |
| Segment angle/meas. width/end angle: | Dimensioning angle in deg. or dimensioning width in mm. |
| Full circleMP Rad |
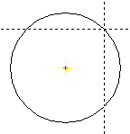 |
Input a full circle with middle point and radius. The full circle input is acknowledged using and aborted using . The instantaneous full circle radius in mm input using the cursor is displayed in the input line as, for example,
|
| Full circle S,E |
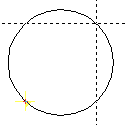 |
Input a full circle with 2 diagonally placed points on the circle.
The full circle input is acknowledged using and aborted using .R>. The instantaneous full circle radius in mm input using the cursor is displayed in the input line as, for example,
|
| EllipseMP Rx,Ry |
 |
Input an ellipse with middle point and radii in X and Y. For cursor input the ellipse is input via the middle point and a point on the ellipse. The full circle input is acknowledged using and aborted using <R>. The instantaneous radii of the ellipse input using the cursor are displayed in the input line as, for example,
|
| Ellipse S,E |
 |
Input an ellipse with 2 diagonally placed points on the circle.
The full circle input is acknowledged using and aborted using <R>. The instantaneous radii of the ellipse input using the cursor are displayed in the input line as, for example,
|
| Close track |
Close the last section (still unclosed track) to the start point, so that a closed contour is created. If another (not the last) section is to be closed than this section can be selected using the marking aid and then combined to a contour using Close track.

